|
|
This chapter shows you how to edit a vocabulary, manage a set of edits, and review the change history with TopBraid Enterprise Vocabulary Net (EVN).
To start up the tutorial version of EVN, first make sure that TopBraid Composer Maestro Edition is up and running, and then send your browser to http://localhost:8083/evn. (If using the enterprise version of EVN, ask your system administrator about the appropriate URL.) If you are using the TopBraid Composer demo version of EVN, use the name Administrator, which is a default name included with the installation; otherwise, use the login name assigned to you for your system.
After you log in you'll see the program's main screen. On the right of the banner at the top is a link that lets you log out, and under that is a Help link that leads to the EVN documentation.
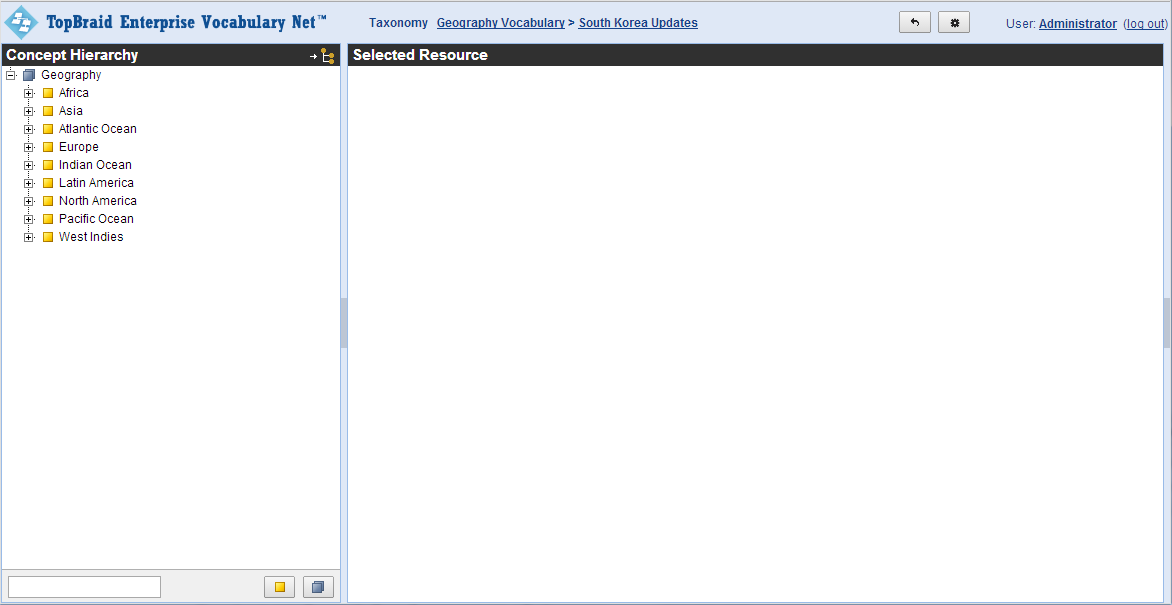
Under the banner is a list of the taxonomies installed with the program and metadata about each one:
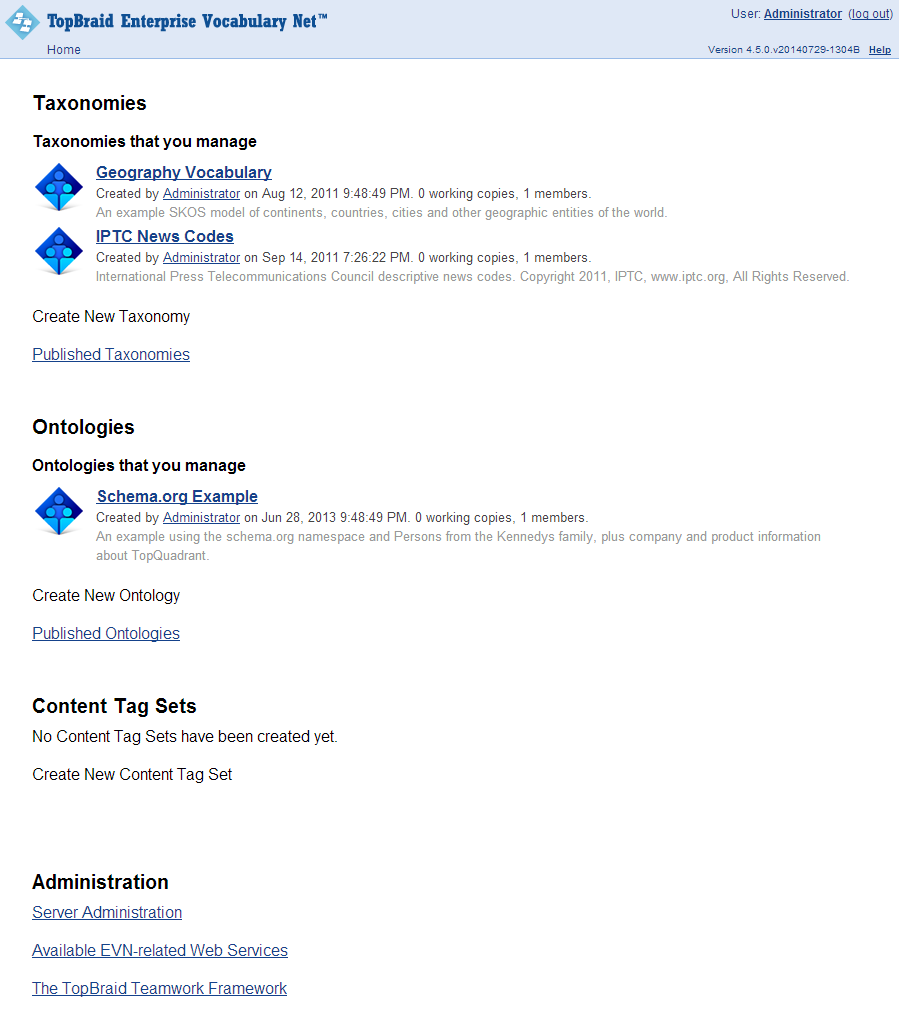
For a brand-new installation, you may only have the Geography and IPTC Newscodes vocabularies installed. For this tutorial, you'll work with the Geography vocabulary. (If you're using the enterprise version of EVN and don't see it, contact your system administrator.) For information on creating a new vocabulary, see Creating a new vocabulary in the User Guide chapter.
Metadata about each vocabulary includes the user name of the person who created it, the date and time of its creation, the number of working copies associated with that vocabulary, and the number of users who have been assigned Viewer, Editor, or Manager roles for the that vocabulary.
If you're logged in as the Administrator, the title of the Geography Vocabulary will be a hypertext link. Click that link to go to the management screen for that vocabulary.
If you have heard about vocabularies on your system that do not appear there, you may not have the appropriate viewing or editing privileges for that vocabulary. To grant you access, a user with manager privileges for that vocabulary needs to assign you a Viewer (or higher) role. See Changing the role of a production or working copy vocabulary user in the User Guide chapter for details about the necessary steps.
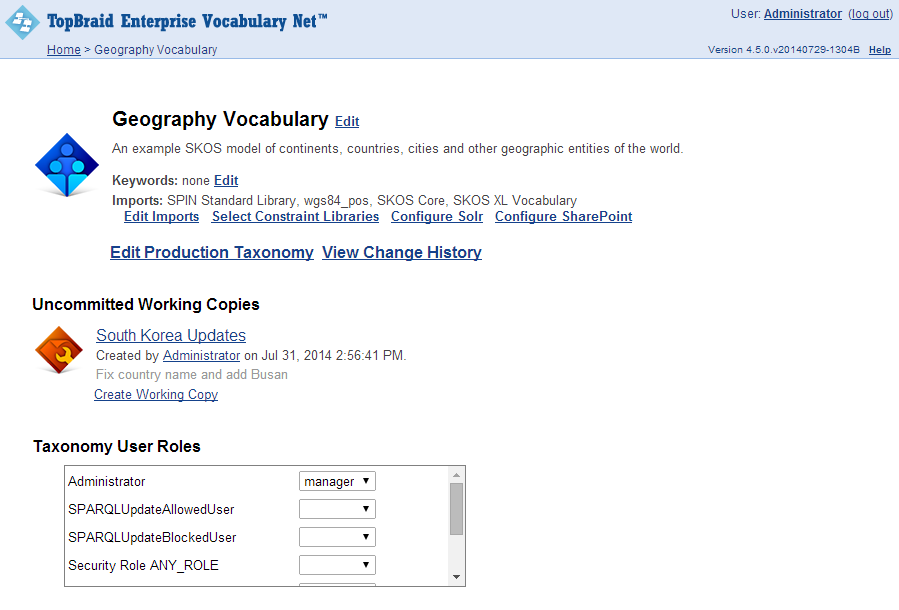
A vocabulary's management screen gives you access to the production copy of the vocabulary and, if you have been granted the appropriate role, to working copies of that vocabulary. You can also create new working copies.

The production copy is the version of the vocabulary currently in use. For example, an online store that organizes menus of product categories based on a managed vocabulary would use the production vocabulary when it builds the menus used on their website.
A working copy is a virtual copy of the production vocabulary created for editing purposes. A working copy may go through a workflow approval process, after which the changes made to it may get published to the production vocabulary at the discretion of the vocabulary manager. There may be several working copies in existence at once as users in various roles make and review changes in those working copies.
When you edit the production copy and save your edits, those changes will be visible by everyone using the production copy. They will also show up in any working copies. When you edit a working copy, those changes will only be visible in that working copy. EVN users with the appropriate permissions can choose between making changes directly to the production vocabularies and using the working copies to change, review and publish new versions. Using the working copies approach provides a built-in review and approval process. It also offers support for having parallel streams of work.
There are three categories of working copies, reflecting three stages that they can move through after they are created:
Uncommitted working copies are copies of the production vocabulary that people are currently working on. Changes to this copy are not reflected in the production vocabulary until this working copy is committed, or published, to the production vocabulary.
Frozen for review working copies are working copies that no one has permission to edit but that have not been committed yet. This is useful as a final review stage late in the editing workflow to allow people to review it while knowing that no further changes can be made during the review period.
Rejected working copies are working copies that cannot be edited or published. A rejected working copy can have its status changed back to "uncommitted working copy" if someone with the appropriate permissions wants to put it back in the workflow. Rejected working copies can also be deleted from EVN.
Below any working copies on the vocabulary management screen you can see a list of users and their roles as they work with this vocabulary. In the illustration above, there is only one user listed: Administrator.
A user can have one of the following roles for a production vocabulary:
Vocabulary Manager A manager has the most capabilities over a vocabulary. In addition to all the tasks that a Vocabulary Editor can perform, a Vocabulary Manager can create and delete vocabularies and control the access privileges that other users have over a particular vocabulary by assigning manager, editor, or viewer roles to them.
Vocabulary Editor In addition to being able to perform all the tasks that a Vocabulary Viewer can perform, a Vocabulary Editor can edit concepts, including their attributes, relationships, and types. When a production vocabulary has a working copy associated with it, a Vocabulary Editor can also publish or reject that working copy's set of changes to the production vocabulary.
Vocabulary Viewer A Vocabulary Viewer can browse a production vocabulary, viewing the concepts and their metadata as well as any change history associated with that data. A Vocabulary Viewer can also generate reports about the vocabulary, export it in other formats, and create a new working copy of the vocabulary. The Viewer then becomes the Working Copy Manager of the new working copy, but for those changes to affect the production copy they must be approved by a Vocabulary Editor.
A user can have one of the following roles for a working copy:
Working Copy Manager Along with all the privileges associated with being a Working Copy Editor, a Working Copy Manager controls the access privileges that others have over a given working copy by assigning manager, editor, or viewer roles to them. A Working Copy Manager can also freeze a working copy for review or revert a frozen copy back to uncommitted status so that those with the appropriate privileges can continue to edit it.
Working Copy Editor In addition to being able to perform all the tasks that a Working Copy Viewer can do, a Working Copy Editor can edit the working copy of the vocabulary. A Vocabulary Editor can also publish or reject that working copy's set of changes to the production vocabulary.
Working Copy Viewer A Working Copy Viewer can do the same things with a working copy that a production Vocabulary Viewer can do with a production vocabulary: view its data, view its change history, generate reports, and export the data.
At the bottom of the screen you will find reports and utilities for working with the vocabulary data. These are described further in the Creating reports and exporting data section of the User guide chapter.
Click the Create Working Copy link to create your first working copy. On the Create Working Copy for Geography Vocabulary screen, enter South Korea Updates as the working copy's name and Fix country name and add Busan as its Description. Click the Submit button, and after creating the new working copy EVN will return you to the Geography vocabulary's management screen, where your South Korea Updates Working Copy will appear under the Uncommitted Working Copies header:
The "South Korea Updates" title will be a hypertext link that leads to that working copy's management screen. Click it now.
Because you're logged in as Administrator, you are the Vocabulary Manager for the Geography vocabulary, so you have all possible permissions associated with it. Users assigned less powerful roles for the Geography Production Vocabulary or the South Korea Updates working copy will not see as many choices available on the working copy's management screen—for example, someone in a Vocabulary Viewer role would not see the Edit Working Copy link:
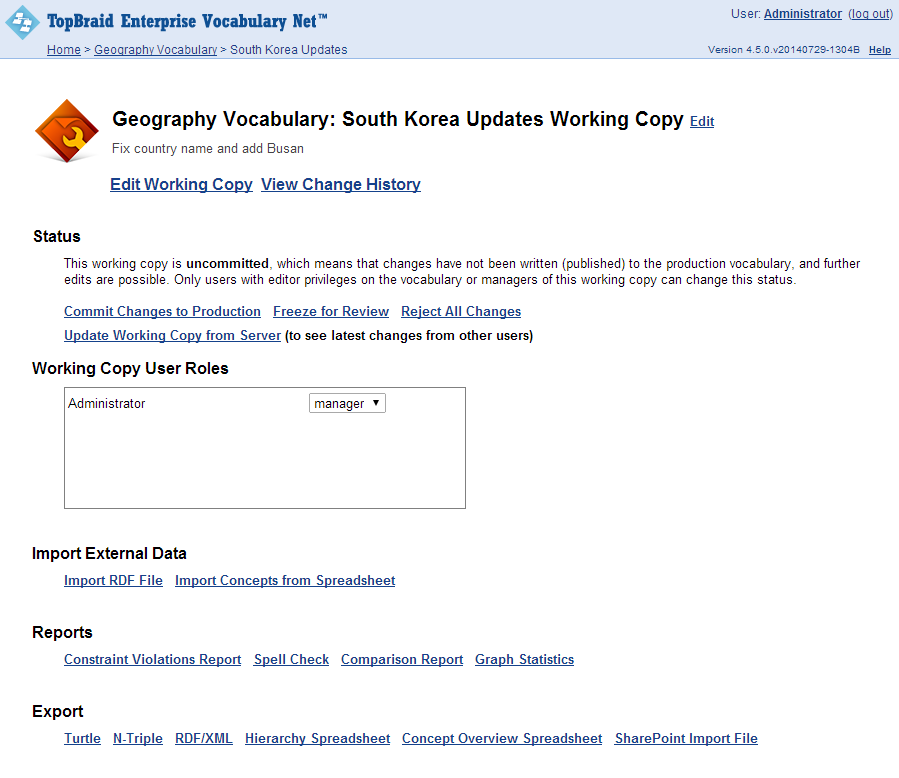
Of course, you haven't made any changes to publish, freeze, or reject yet, so let's edit this working copy. Click the Edit Working Copy link, and you'll see the editing screen.
You can drag the dividers between the editing screen's panels to resize them, and the side panels can be collapsed to make more room. If your search pane is displayed, collapse it now by clicking the dark part of the divider between the center pane and the search pane (just to the left of "Standard Relationships"):
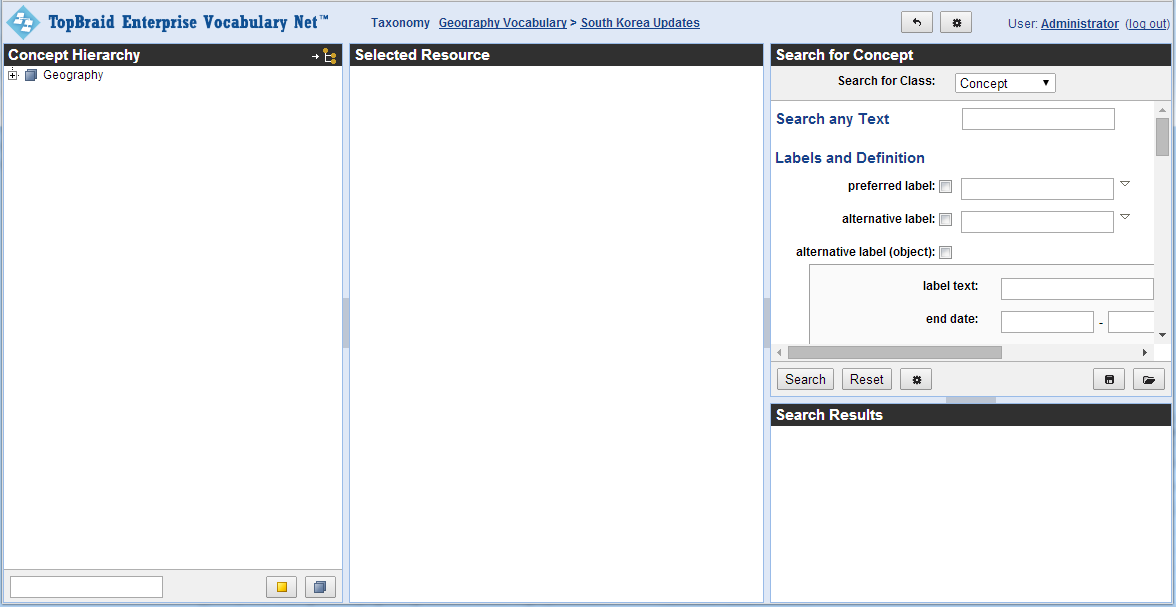
This leaves plenty of room to display data about the vocabulary's concepts. (We'll come back to searching later.)
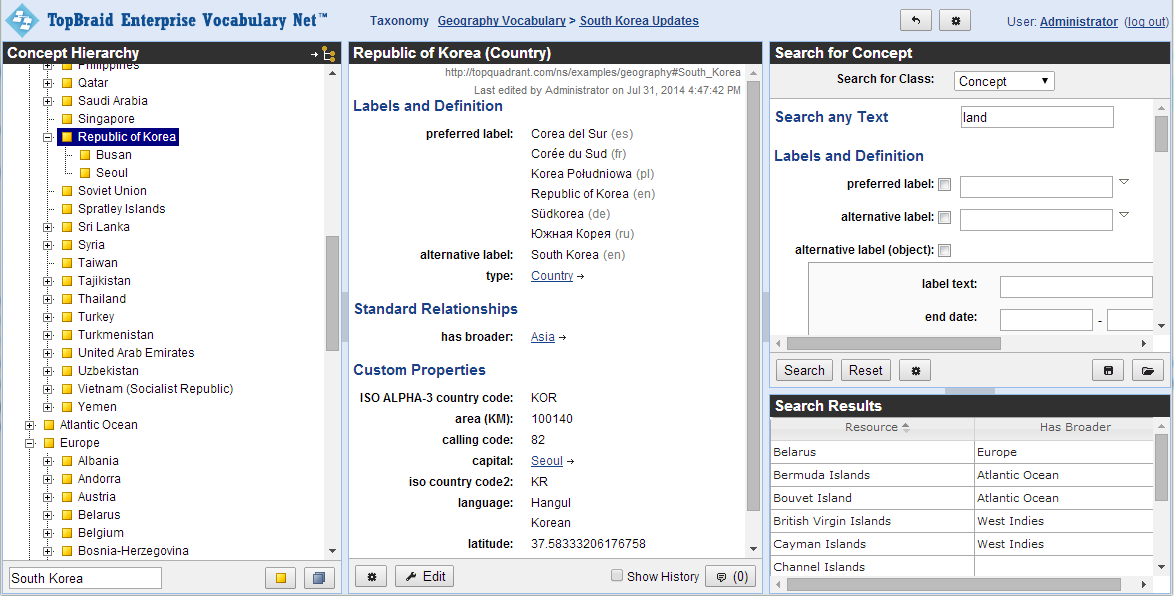
On the Concept Hierarchy tree, clicking the little squares with plus and minus signs will expand and close up subtrees of concepts. Click directly on a concept's name to see data about it in the panel on the right. For example, click on the plus sign next to "Europe", and then click on "Belarus", and you will see information about this term on the right of your screen. This includes information that is part of the W3C SKOS standard for vocabulary management, such as an alternative label for the concept and a history note about it. It also includes custom properties added to extend the SKOS standard for this vocabulary, such as the area figure for the country and their calling code.
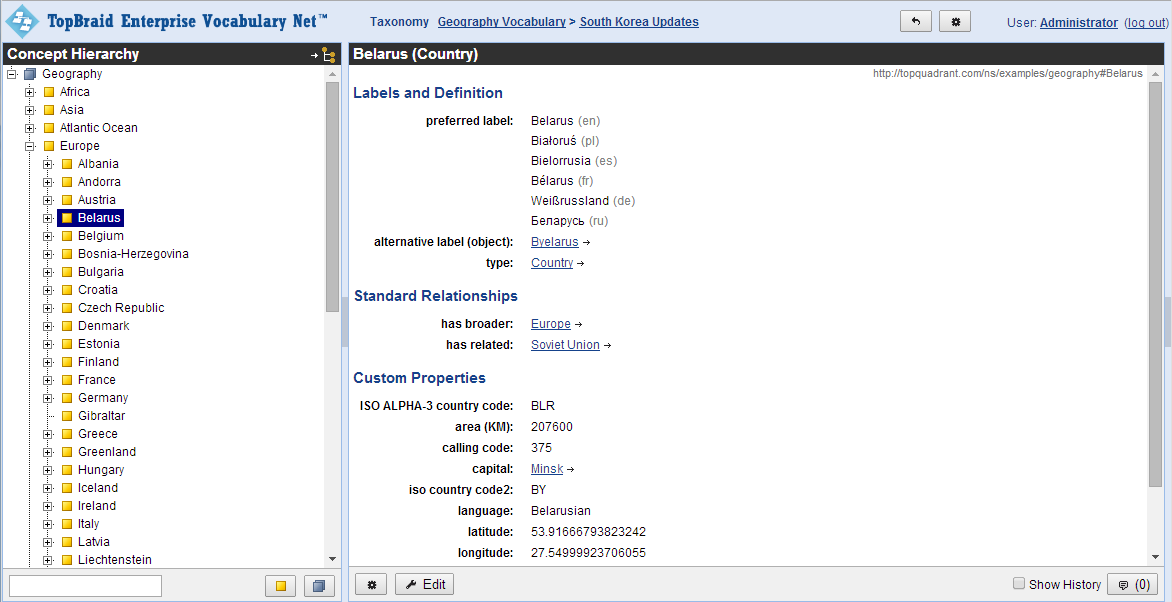
Alternative label and history note are both attribute properties. Relationship properties such as Belaurus's "has broader" and "has related" values describe relationships to other concepts, which may or may not be in the same vocabulary. Relationship properties are hypertext links; double-click Belaurus's "has related" value of "Soviet Union" and the same panel will display data about that concept. (Use your browser's Back button to return to the Belarus screen.)
In addition to the Concept Hierarchy, another way to find specific concepts is to use the quicksearch field in the lower-left of your screen, under the Concept Hierarchy. Type the word "South" there, and a list will show you the concepts beginning with those letters.
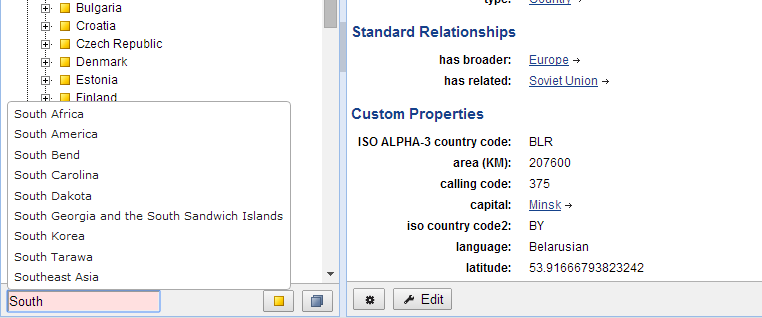
Select "South Korea" from the list, and EVN will take you to that concept on the Concept Hierarchy and on the main panel. We're going to change its preferred label value to the country's official name of Republic of Korea and make South Korea the alternative label, and then we'll add the city of Busan as a new concept that appears as a child node of Republic of Korea in the Concept Hierarchy.
Even if you have the appropriate rights to edit a given vocabulary, if that vocabulary includes data from other sources, you will not be able to edit or delete the included data. See Importing an RDF graph into an EVN vocabulary in the Administrator guide chapter for more information.
Once you have the South Korea data displayed, click the Edit button  at the bottom of the screen to display the edit screen for this concept:
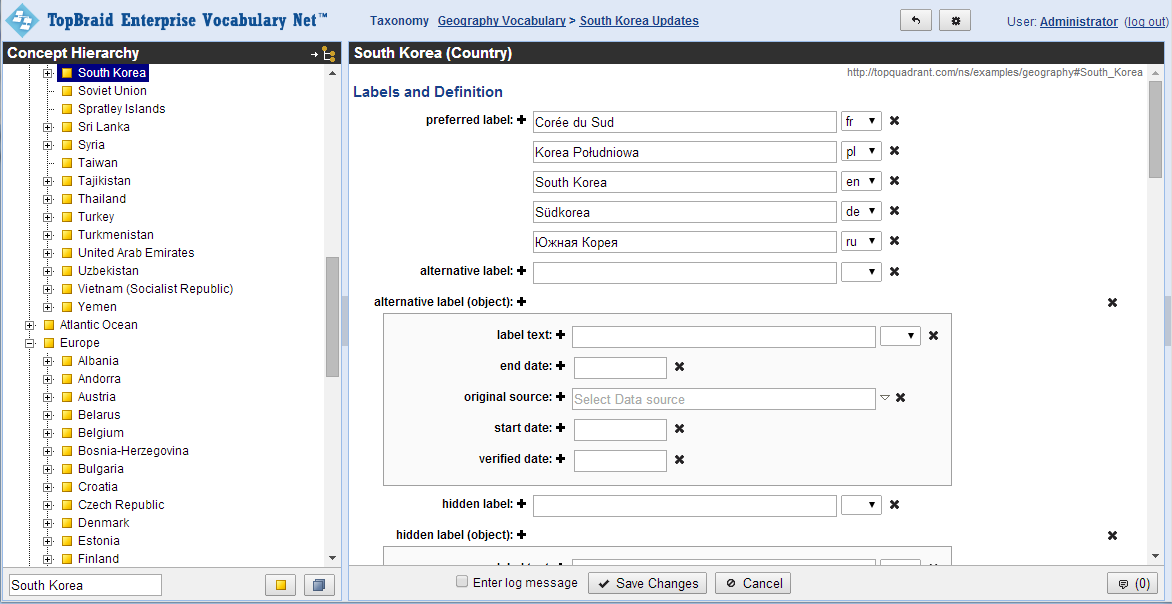
Before you clicked the Edit button, the form only displayed the concept properties that had values assigned to them, but the edit screen displays all possible properties for the concept that you are editing so that you can add news ones. Note the scroll bar on the right of the editing screen above—there are enough potential properties for this concept that they won't all fit on one screen.
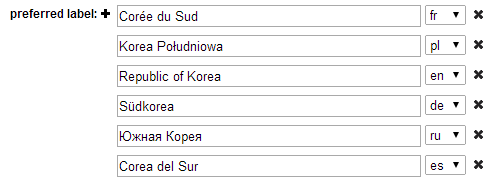
Replace the "South Korea" value in the preferred label property with "Republic of Korea".
EVN lets you add multiple values to a single property where appropriate. We're going to add the Spanish term for "South Korea" to this concept. Click the plus sign next to "preferred label" and a new blank appears under "South Korea". Enter "Corea del Sur" there, and pick "es" from the drop-down list to the right of it. (Your EVN administrator can customize the list of language code choices offered on this list.)
EVN has a built-in set of rules to implement constraints defined as part of the SKOS standard, such as the rule that says that you shouldn't have two different preferred labels for the same concept in the same language. (Your EVN administrator can customize these rules for each vocabulary and add new ones depending on your vocabulary management requirements.)
Another SKOS rule says that you can't have an alternative label that is the same as the preferred label in a given language. Let's break this rule and see what happens. Enter "Republic of Korea" as the alternative label for this concept and click the Save Changes button at the bottom of the screen. A message box will tell you about the problem, and the label for the property with the problem is displayed in red behind the message box:
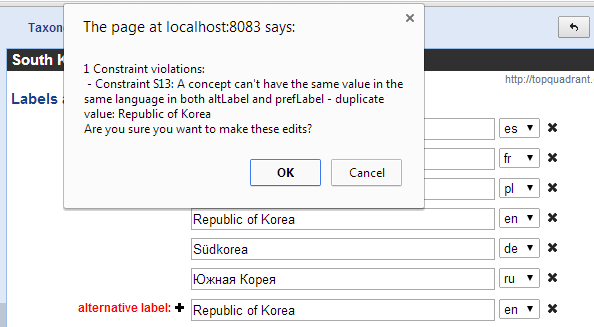
Click this message box's Cancel button, set the alternative label to "South Korea", and Save Changes button again. You'll be returned to the concept display screen, where you'll see your new values; also note that the node of the Concept Hierarchy tree on the left that had been labeled "South Korea" is now called "Republic of Korea".
Next, we're going to add a new concept. First, click the plus sign next to your "Republic of Korea" node to see its children. It only has one: the city of Seoul. To add a new child node, make sure that "Republic of Korea" is selected on the tree and click the "Create Concept" button  below the Concept Hierarchy. EVN will display a Create Concept message box to ask you for some information about the new concept:
The Label is the preferred label for the new concept. Enter "Busan" here. As we saw when we edited the "South Korea" preferred label, we can always change a label later.
The Identifier is the internal ID used by EVN to track the concept. (Because SKOS is based on the W3C RDF standard, this ID is a URI.) Advanced users sometimes have reasons to customize this, but you can't go wrong by just leaving the default value that appears.
The Type identifies whether the new Concept is a regular concept or a specialized class. EVN lets you create these classes so that specialized properties can be stored for some concepts but not others—for example, so that forms for editing countries include the calling code, but forms for editing continents do not. Leaving this set at the default value of "Concept" is usually fine, but because you're adding a city and a City type has been included with the Geography vocabulary, pick that and click the OK button.
EVN will add Busan as a new child of Republic of Korea on the Concept Hierarchy and display the editing screen for it on the right.
For more descriptive properties, EVN includes rich text formatting controls. Give Busan a definition of "Largest city after Seoul", then select the word "Largest" with your cursor and click the I button to set it in italics.

Click the Save Changes button at the bottom of your screen, and you'll see the note you added on the display screen for your new Busan concept.
Try following similar steps to create a new concept as a child of Busan. Give it a label of "Test", and leave the Type value at Concept. On the editing form for this new concept, just click the Save Changes button without adding any new data.
We don't really want this test node, so we're going to delete it. At the bottom of your screen, next to the Edit button, is the button for the gear menu  , which lets you perform several different actions on your concepts. With your Test node selected on the Concept Hierarchy, pick Delete... to delete it, and a message box will ask you whether you're sure that you want to delete the selected node and its associated information. Click OK to complete the operation.
Select "Republic of Korea" on the concept hiearchy tree and click the Show History checkbox in the lower-right corner of your screen. This displays an alternative version of the concept data form that shows who made what changes when:

Each change entry shows who made it and when they did. It also includes a hypertext link that lets you revert the change.
As you might imagine, the "Show history" view can get cluttered after a while. That's why it's handy that the checkbox lets you toggle it on and off.
Uncheck the Show History checkbox before continuing.
Click the dark gray part of the right border of your screen to display the search pane. The following shows the results of searching for all concepts with "land" in their preferred label, with their "has broader" value retrieved with the resource names:
A scroll bar on the right of the search form shows that it has too many fields to display them all at once. Scroll down to see additional properties that you can use as search criteria and retrieve. Checking a property on the form indicates that you want that property's values included in your search result; entering a value in one of the search fields shows that you want to search for concepts that have that string in their settings for that property. Each field also has menu, accessible by clicking the triangle on its right, that gives you additional ways to specify the data to search for; see Searching for substrings, exact strings, and other alternatives in the user guide for a description of the options.
The Search for Type field at the top of the form lets you search among specialized classes and adds any custom properties for those types to the search form. For example, if you search among the Geography vocabulary's Country concepts, you will see the custom calling code, capital, and language properties on the search form along with the standard SKOS ones such as preferred label and has broader.
In search results, concept preferred labels will be included by default as the resource name, so there is no need to check "preferred label" on the form. In the illustration above, the user wanted to search for all concepts with "land" in their preferred label and to retrieve the "has broader" value as well. The scrollable Search Results panel below that shows the first few results of this query after the Search button was clicked. The gear button next to the search reset button lets you edit the search results as a batch as well as exporting the search results to XML or to a tab-separated value file suitable for importing into a spreadsheet program like Excel. See the Searching section of the user guide for more details on these possibilities.
Click the darker part of the divider bar at the left of the search form (just to the left of "Standard Relationships" in the illustration above) to collapse the form back to the right.
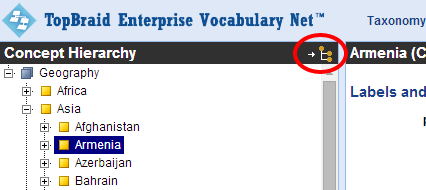
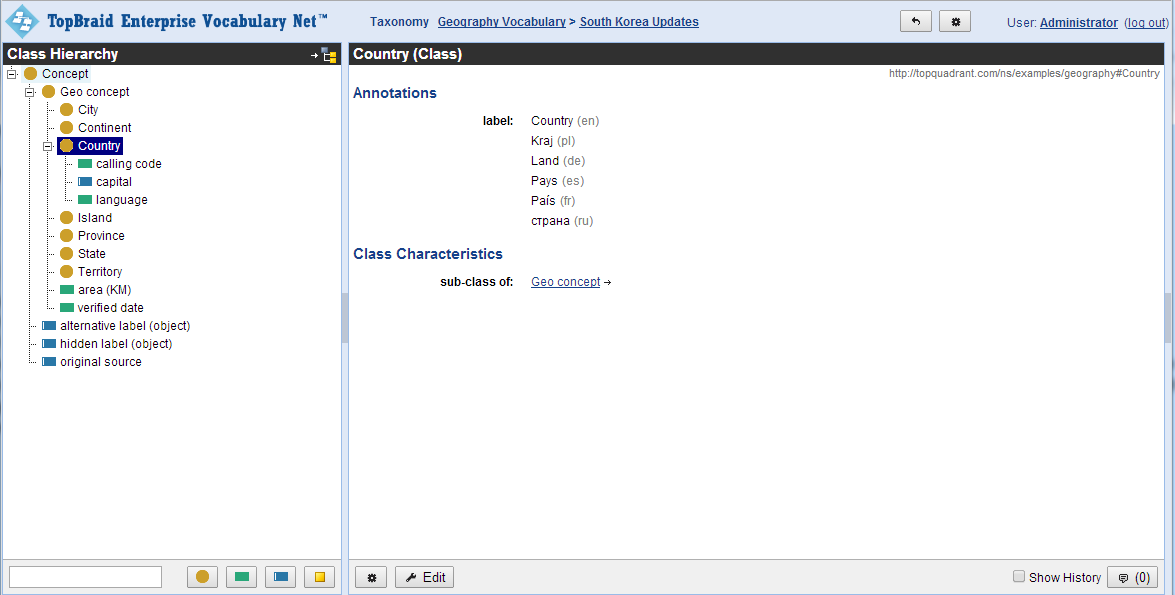
Earlier we saw that specialized subsets of concepts had been defined for the Geography vocabulary for easier customization. Click the Switch to Class Hierarchy icon at the top of Concept Hierarchy to display the Class editing screen.
As with the Concept Hierarchy, you can expand the Classes hierarchy by clicking the plus signs next to each type name. Light brown circles represent types, green rectangles represent attribute properties, and blue rectangles represent relationship properties. Below we see that the Geo concept class has been customized with the addition of area and verified date attribute properties, and that the Country type has been customized with three additional properties: calling code and language attribute properties and a capital relationship property. (The additional properties added to Geo concept will also appear on its subclasses such as City, Continent, and Country.)
Buttons across the bottom let you create new classes, attributes, and relationships as children of the currently selected class, as well as new concepts for the selected class. The Delete choice of the gear menu at the bottom of the screen let you delete the selected node from the Class Hierarchy tree. The Working with classes section of the User guide chapter explains these features in further detail.
Click the Go to Concepts button in the upper-right of your screen to return to the main Concept Hierarchy screen.
Clicking the hypertext links of your vocabulary name or working copy name at the top of your screen (in this case, "Geography Vocabulary" and "South Korea Updates", respectively) would return you to the management screen for either of these. If you click Geography Vocabulary and then Edit Production Taxonomy on the Geography vocabulary management screen, you would see that South Korea is still there, with that name and no Busan child. You've been editing a working copy, so the official production version has remained unchanged. We'll see how to put your working copy's edits into production shortly.
First, imagine that you're part of a taxonomy management staff and that it's time to review the changes you've made before putting them into production. Click the "South Korea Updates" link at the top of the screen to go to the Working Copy management screen, and then on that screen click Freeze for Review. Now, everyone—including yourself, the Administrator—only has read access to the vocabulary. The Edit Working Copy link disappears, and new link—Allow Further Changes—replaces Freeze for Review. Now no one can edit this working copy, regardless of their roles, until an administrator like yourself clicks Allow Further Changes.
Click View Working Copy and you'll see that the interface for working with the data is pretty much the same as before except that, when you have a resource selected on the concept hierarchy, the Edit button at the bottom of the screen is grayed out so that you can't edit the data. (This is the same interface that users who only have Viewer privileges see.)
In a typical production cycle, you would let anyone interested in updates to the vocabulary know that you were finished creating your South Korea Updates working copy and that they should review the changes before you published the changes to the production version of the vocabulary.
In a large metadata management environment, you might have one person creating the working copy, several others editing it, additional people reviewing the changes, and another person publishing the changes to the production copy, but for this tutorial, you're doing all of these yourself.
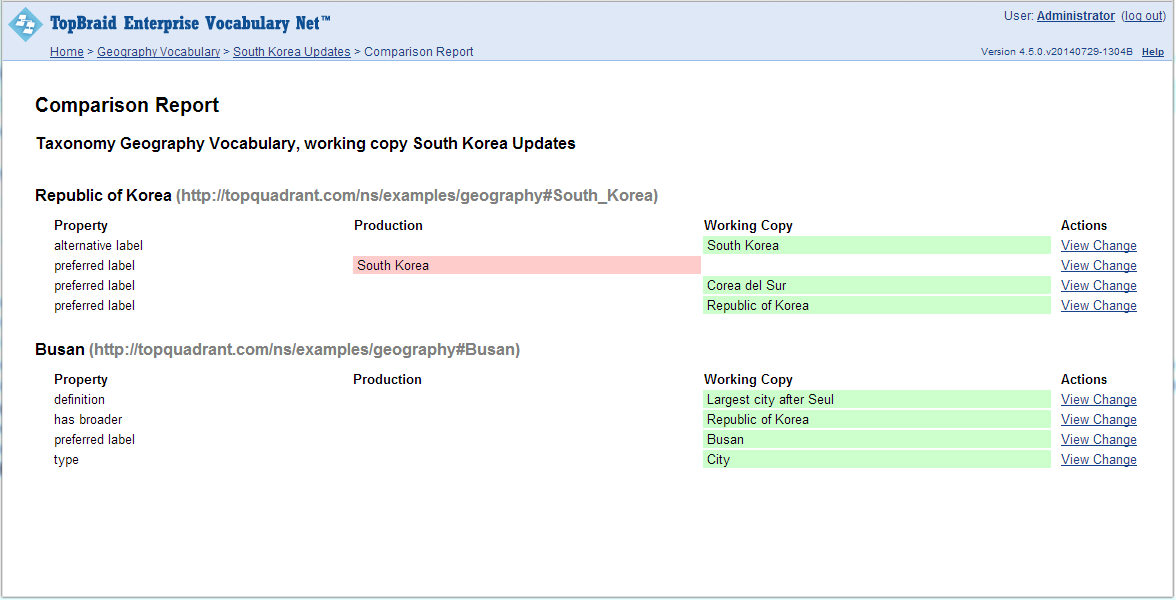
Click the "South Korea Updates" link at the top of the screen to return to the Working Copy Management screen, and then click the Comparison Report link under the "Reports" header near the bottom of that screen. This displays a report that shows where this working copy differs from the production copy—a handy report to run during the final review cycle for a working copy:
Let's say that everyone who needed to review these changes has done so, everyone approves, and you're ready to make the changes official. On the "South Korea Updates" working copy management screen, click on Commit Changes to Production. After a message box confirms that you want to do this, you'll see a message that this working copy has been committed. When you return to the Geography vocabulary management screen, you will no longer see this working copy listed, because now that its changes have been made to the production copy, they are no longer proposed changes.
Click Edit Production Taxonomy and check Asia's child concepts again. You will see that the Republic of Korea is there instead of South Korea, and it will have Busan as a child along with Seoul.
You're now ready to explore the User guide chapter to learn about all the other features available as you use TopBraid Enterprise Vocabulary Net. You'll find out how to view reports on vocabularies, how to export them to and import them from spreadsheets and other formats, how to perform batch operations on them, and more.